
Auto Clutch Setup Guide
VisApex Auto Clutch can automatically operate the clutch when using an H-pattern shifter while still allowing you to control the clutch manually using a physical clutch pedal or clutch paddle.
Setup consists of two parts: configuring VisApex and then configuring the controls inside your game.
1. VisApex Setup
Select a Profile
Select the profile you want to configure, or create a new profile for the game.
Auto Clutch settings and controller mappings are stored as part of the VisApex profile, allowing you to maintain different configurations for different games or controller setups.
Enable the Virtual Controller
Go to Controller → Virtual Controller and enable the Virtual Controller.
Select the appropriate output backend for your game:
- Xbox Controller (ViGEm) — Use for games that support XInput.
- vJoy — Use for games where DirectInput is preferred or required.
If you use vJoy, create a vJoy device with:
- 6 analog axes: X, Y, Z, Rx, Ry and Rz
- 14 buttons
This matches the Virtual Controller layout used by VisApex and allows you to switch between the Xbox Controller (ViGEm) and vJoy output backends without reconfiguring your controller mappings.
Assign the Auto Clutch Output
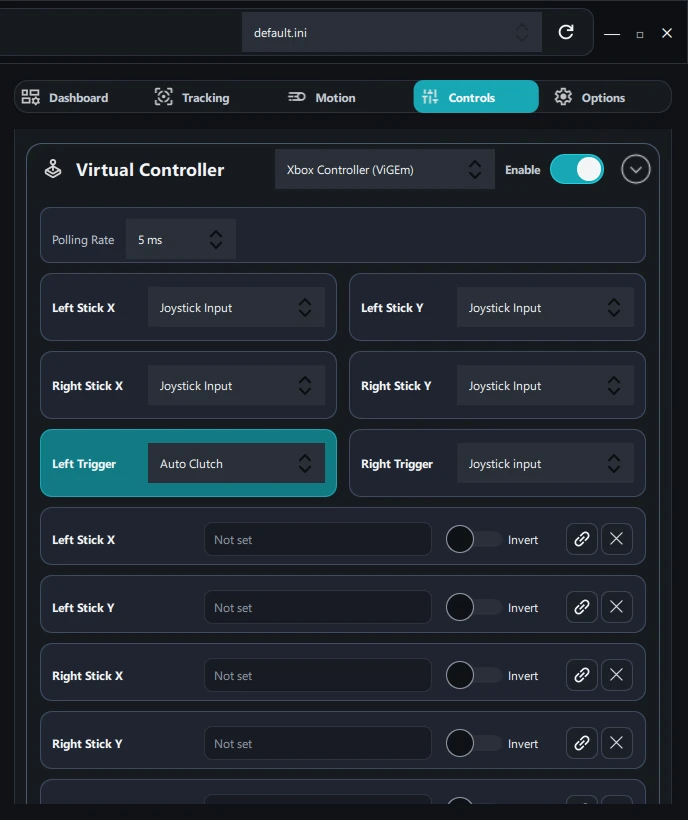
Select Auto Clutch as the input for the Virtual Controller axis that you want to use as the clutch.
For Xbox Controller (ViGEm), assign Auto Clutch to either:
- Left Trigger, or
- Right Trigger
For vJoy, assign Auto Clutch to either:
- Z Axis, or
- Rz Axis
You will later bind this Virtual Controller axis as the clutch inside the game.
Bind a Manual Clutch Input
Bind a physical analog input to the same Virtual Controller axis that you assigned to Auto Clutch. This can be a clutch pedal, clutch paddle, or another available controller axis.
This input is used when Clutch Mode is set to Manual and allows you to operate the Virtual Controller clutch axis independently. You will need this when binding the clutch axis in many games.
If you do not have a physical clutch control, you can temporarily use an available analog axis on another controller for the game setup process.
Bind Your H-Shifter
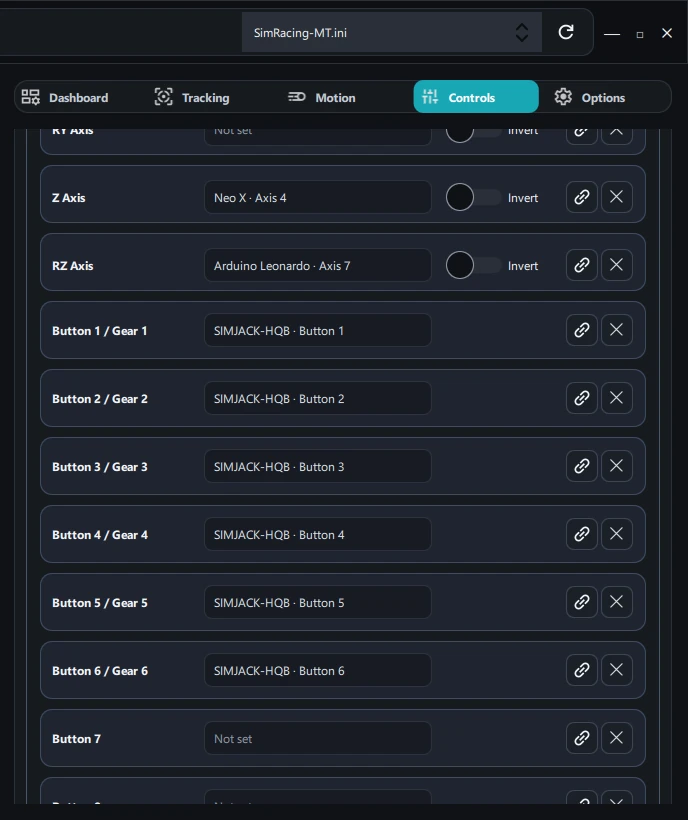
Bind each position of your physical H-pattern shifter to the corresponding Virtual Controller button.
For example:
- Gear 1 → Button 1
- Gear 2 → Button 2
- Gear 3 → Button 3
- Gear 4 → Button 4
- Gear 5 → Button 5
- Gear 6 → Button 6
The VisApex controller binding list shows which Virtual Controller button is mapped to each gear.
Bind Reverse in the same way.
Configure the Clutch Mode Shortcut
Go to Controller → Shortcut and configure the Clutch Mode shortcut.
The default shortcut is:
Ctrl + Alt + A
Use this shortcut to quickly switch between Auto and Manual clutch operation while driving.
You can also switch Clutch Mode using the Auto Clutch switch on the Dashboard.
Optional: Reverse Gear Protection
You can enable or disable Reverse Gear Protection from the Dashboard.
When enabled, VisApex will not output the Reverse gear selection unless the shifter has remained in Neutral for more than one second.
This helps prevent accidentally shifting into Reverse while driving at high speed.
Using Multiple Physical Controllers
The VisApex Virtual Controller can combine inputs from multiple physical controllers at the same time.
For example, you can bind an H-shifter from one controller, a clutch pedal from another, and a handbrake or other unused axes and buttons from additional controllers.
These inputs can then be presented to the game through a single VisApex Virtual Controller.
2. Game Setup
Optional: Hide Physical Controllers with HidHide
Some games may receive input from both your physical controllers and the VisApex Virtual Controller.
For example, moving your H-shifter could cause the game to receive the original input directly from the physical shifter as well as the remapped gear input from the VisApex Virtual Controller.
If this causes duplicate or conflicting inputs, you can use HidHide to prevent the game from seeing the original physical devices.
When configuring HidHide:
- Add VisApex to the HidHide application whitelist.
- Hide the physical devices that you have mapped through VisApex, such as your H-shifter or handbrake.
- Enable device hiding.
VisApex will still be able to read the hidden physical controllers, while the game will receive their mapped inputs through the VisApex Virtual Controller instead.
Important: Make sure VisApex is added to the HidHide application whitelist before hiding your physical controllers. Otherwise, VisApex may also be prevented from reading them.
Start the Game
Start your game and open its controller or input configuration.
Make sure the VisApex Virtual Controller is enabled before configuring the game’s controls.
Switch Clutch Mode to Manual Before Binding
Before binding your controls, set Clutch Mode to Manual.
When Auto mode is active, selecting a gear can generate both a gear selection and automatic clutch movement. Some games may detect the clutch movement instead of the intended gear input while waiting for you to assign a control.
Using Manual mode prevents Auto Clutch from operating during the binding process.
Bind the Gears
In the game’s controller settings, bind each gear to its corresponding VisApex Virtual Controller button.
Move your physical H-shifter into each requested gear. VisApex will translate the physical shifter position into the Virtual Controller button configured for that gear.
Repeat this for all required gears, including Reverse.
Bind the Clutch
Keep Clutch Mode set to Manual.
In the game’s controller settings, select the clutch binding and operate your physical clutch pedal or clutch paddle.
VisApex will pass the physical clutch input through the Virtual Controller clutch axis you configured earlier.
The game only needs this one clutch binding. The same Virtual Controller axis is used when Auto Clutch is enabled.
Enable Auto Clutch
After you finish configuring the game’s controls, switch Clutch Mode to Auto.
VisApex will now automatically operate the clutch when you shift gears using your H-shifter.
Whenever you want to control the clutch yourself, switch Clutch Mode back to Manual using either:
- the Auto Clutch switch on the Dashboard, or
- the Clutch Mode shortcut (Ctrl + Alt + A by default).
Your game’s controller bindings do not need to be changed when switching between Auto and Manual modes.
Setup complete.